Showing posts with label crochet. Show all posts

Plush Team Summer Challenge


After a lot of busy months I am so happy that I have managed to make something for this month's Plush Team Challenge. The theme is 'Dessert or Desert' and I decided to combine the two and make a cactus ice cream! I drew a little picture of the idea that was in my head, and a few hours later, after some unravelling and re-doing, I finished it!

The perfect desert dessert. The cactus ice cream cornet.

Busy, busy...


I haven't blogged for ages :/ sorry about that! Time just seems to fly past at the moment! Just so that you know I haven't been lazy, here's some of what I've been doing lately. This is the beginnings of Monsieur Le Starfish who I am making as part of the latest Plush Team challenge.


And this is the beginnings of a dog which will be an accessory to one of the dolls I am making for Plush You 2012.

Crochet Caricatures

This is something I made recently as a custom order. I always find caricatures harder to do if they are of people I know well - is that strange? This one is of my sister and my little niece!

International Yarn Bombing Day 2012

It's International Yarn Bombing Day today, and this is what the main street in Jajce, Bosnia and Herzegovina looks like. If you look closely you'll see that each street light has a stripey jumper!

Photo Challenge 3KCBWDAY2

This is Eco Bunny, and he, like me, lives in the beautiful country of Bosnia and Herzegovina. Unfortunately some of the countryside in this beautiful country is messed up by rubbish - plastic bottles, plastic bags and other stuff like that. Eco Bunny is made from and stuffed with plastic bags and is leading the recycling revolution in our neighbourhood. Here he is just across the street from our house in a pile of cardboard boxes.
Here he is again in the bombed out house across from our house.
And once again visiting another pile of rubbish. Unfortunately these pictures only show the bad things about Bosnia and Herzegovina - but for the photo challenge I think they work! But - please take some time to look at some of my other blog posts where you will see how beautiful the country really is, and if you ever get the chance, you really should visit!

This blog post is for day 2 of Eskimimi's Knitting and Blog Week.

To nominate my photos for the photo challenge prize please click here.

To see more photos from today's photo challenge copy and paste the code 3KCBWDAY2 into google.

Colour Lovers

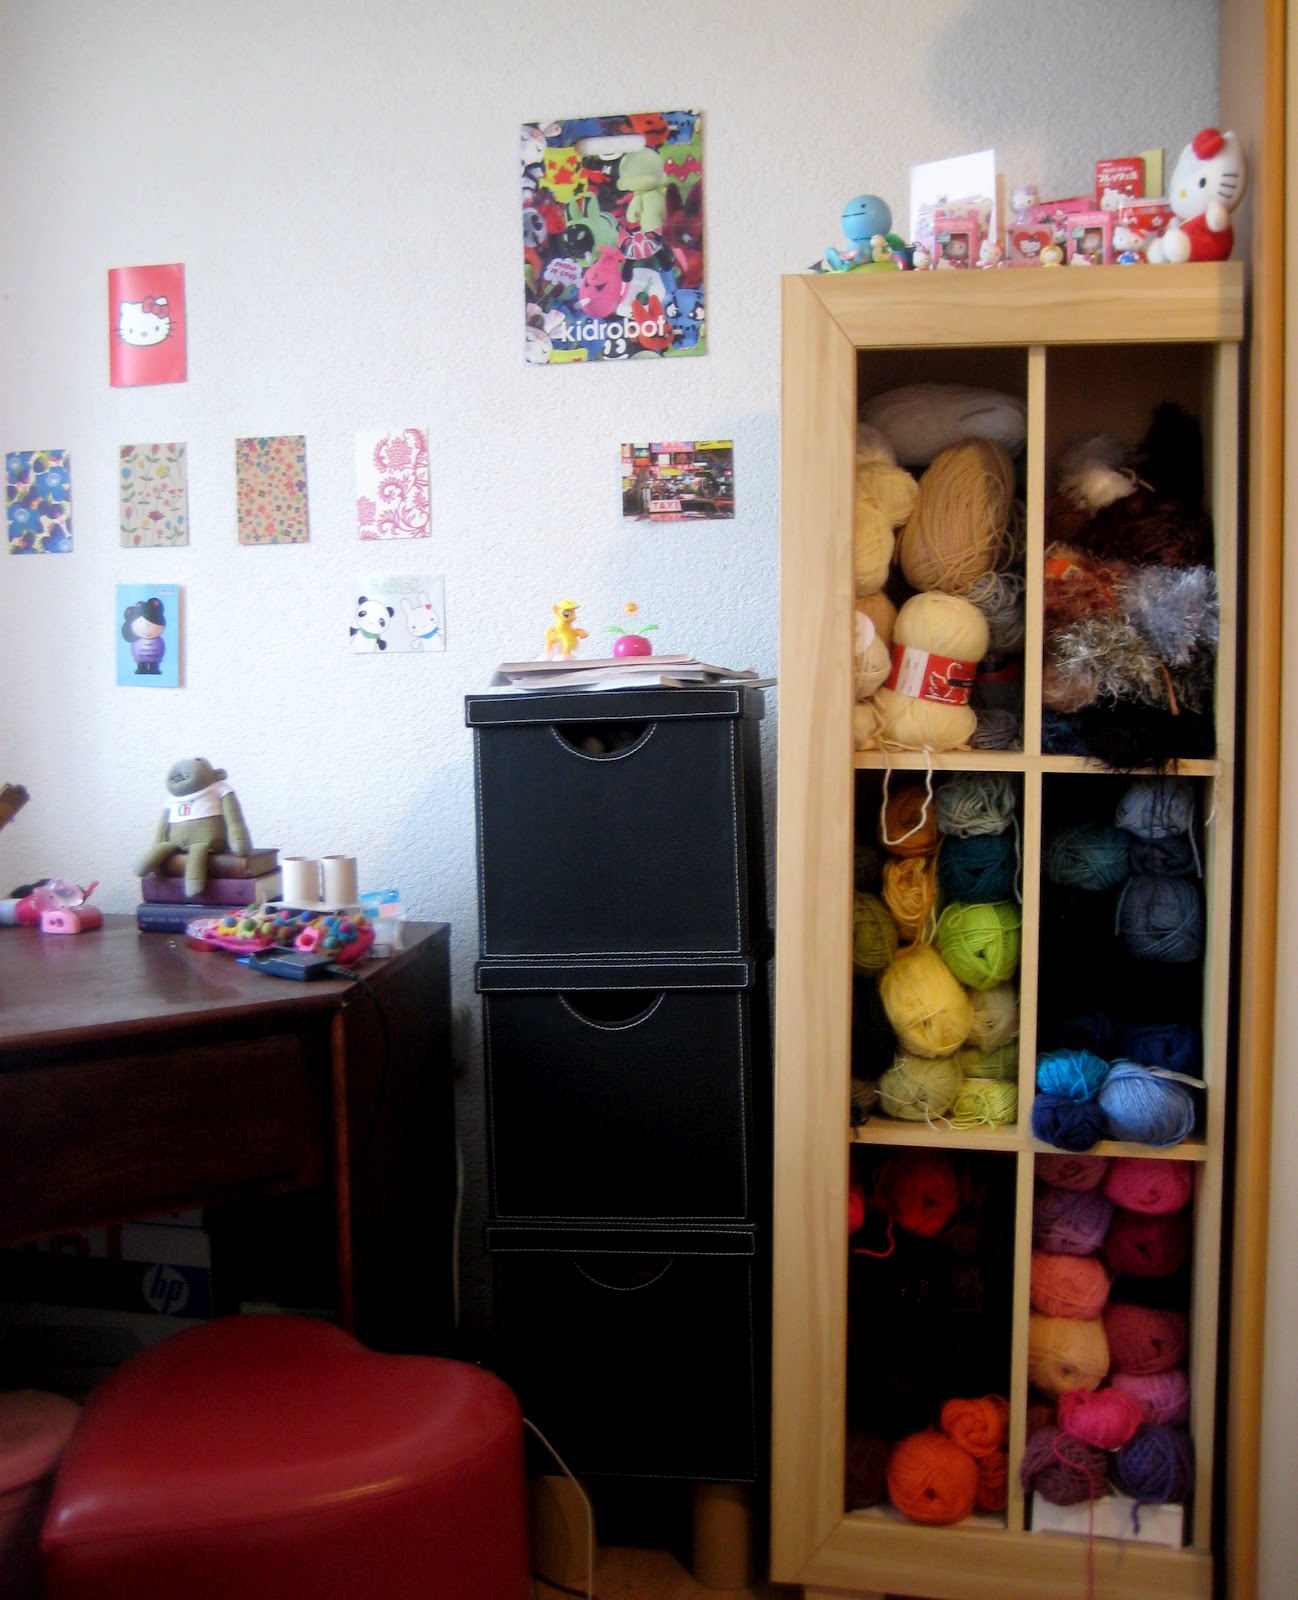
This week I am taking part in Eskimimi's Knitting and Crochet Blog Week . Today's theme is 'colour lovers'.   This is a picture of my wool stash and you can see I have plenty of colours! The top left shelf is the skin tone colours, top right is eyelash yarn for hair, then yellows and greens, blues and greys, reds, oranges and browns and last of all pinks and purples. 

I often start making an amigurumi by choosing 3 or 4 balls of wool in a colour combination I like and then finding a complimentary combination of eye colour and the colour of felt around the eyes. The personality of the doll then develops from those colours as I make it.
Looking back over the dolls I have made I've discovered that this combination of skin, hair and eye colours is the one I've used most often. It's funny because, if I'm asked, I always say that pink and purple are my favourite colours, but when I asked a friend to do a critique of my Etsy shop recently, one of her comments was that there wasn't enough pink in it, and I looked in my wardrobe the other day and realised that most of my t-shirts are green. I'm starting to think that perhaps pink and purple aren't my favourite colours after all! 

What is your favourite colour?

3KCBWDAY


Small beginnings...

I mentioned a week or so ago that we had a plan brewing for a big creative event for young people here in Jajce - the plan is still brewing and is coming along nicely. Today a group of us started limbering up for the big day. Small beginnings but hopefully the end result, when the day comes, will be fab!


Not the skull, just the pitcher and other stories...

Today's theme for Fresh Stitches Design Week is 'Trouble Spots'. Yesterday I told you that I am trying to make an amigurumi version of this picture for the current Plush Team challenge. I showed you how I'd done the skull and ended by saying 'next step - the pitcher'.
The pitcher is definitely a trouble spot! It's such a weird shape, it is going to be really hard to make it in 3d. Here's a sketch where I've tried to imagine it flattened out. I've only drawn 2 sides - the third side will be even harder!
 I've decided to start with the base as an equilateral triangle and build it up from there, making each side separately. Does anyone have any better ideas or other advice to give?
And in today's other news, the circus is in town! If you look carefully you can see a black blob to the right of the first megaphone - that is the backside of a monkey! Yes, a real monkey, tied to the roof of the van as it goes through town advertising the circus. I took the photo quickly with my phone as it drove by which is why I managed to miss getting all of the monkey. Some things only happen in BiH! (well probably other places too, but not any places I've been too.)

This blog post is for Day 5 of Fresh Stitches Design Week.

Skull and Pitcher

The Plush Team Challenge for March and April is to make a plush self portrait or a plush still life. When I read the words 'still life' the idea came into my head to try and make an amigurumi version of a Picasso still life painting. I looked on google images and decided on this one - The Skull and Pitcher.
 So far I have only made the skull - here are my workings out in my notebook. I'm not really sure if I will succeed in making everything - it's harder than I thought!
The skull has turned out ok-ish though. Next step - the pitcher!

This post is for Day 4 of Design week by Fresh Stitches.

Amigurumi Cacti


You see quite a lot of Amigurumi Cacti popping up on Etsy. Some people make realistic looking ones and others go for the cute kawaii option with a little face. This pattern by mutts is one of the cutest and most original ones I've seen. She sells some fantastic patterns in her Amigurumi Friends Pattern Shop and she also has her Studio Shop where, if you're not much of a crocheter, you can buy the finished articles.

The black cat holds the key


New in my Etsy Shop, this cat holds the key that you are looking for. The key to your heart or maybe someone else's. The key to your future. The key to understanding things that can't be understood... or the key to the cupboard that you know is full of chocolate and other lovely things.

what do you think?


This is the first amigurumi doll I've finished in ages! I've been so busy that I haven't had time to make any. Maybe it's because I'm a bit out of practice, or because it took me so long to finish her, but somehow she didn't turn out quite like I wanted. I haven't decided yet if I will put her in my shop, and if I do I need to think of a name and a story for her and some kind of accessory.... What do you think?

Buckle


My Mum sent me a text saying that my Grandma - who we called Buckle, would have been 100 today. She actually died almost 20 years ago but I still remember so much about her. She had a very big influence on my life and is probably the reason I love making amigurumis as she was the first person to teach me things like knitting and crocheting when I was little. She was an artist and was always making things. This picture was taken in Devon ages ago by me so I'm not in it which means you don't get to see me looking like a funny little girl :) The little girl in the front is my sister and then there's Buckle, my Mum and Dad and my Uncle. She was an awesome Grandma. The best you could ask for :)

working hard


I've been working hard today finishing off unfinished amigurumis and making new ones. I've got quite a few custom orders to do and I need to finish my pieces for the CandyLand Show so it's hard work time at the moment. It's good to be busy though :)

a few too many works in progress?


This is what my work table looks like at the moment - a complete mess! I've got too many things on the go at once I think and I'm not being very focused in finishing one thing before starting the next. Oh well, I guess it will sort itself out in time - I will eventually finish everything.


How organised is your work space?

Join the Crochet-Along


The Itsy Bitsy Spider is hosting another Crochet-Along. This time it is with an Autumn theme and we will all be making pumpkins like in this picture. If you want to join in click here and you will be taken to the Itsy Bitsy Spider's blog where there are more instructions. It's free to join in, you get a free copy of the pattern to work from and step-by-step lessons on her blog. When you are done you can submitt your photos to the Crochet-Along flickr group and you might even win a prize! So what are you waiting for? Sign up now...

Cream Cheese Brownies and Amigurumi


For those of you (is there anyone?) who read my blog regularly you might remember a month or so back I posted something about cream cheese brownies. I posted that because the amigurumi I was working on was for a friend and she didn't want anyone to see it before her and so as I couldn't blog about amigurumi that day I blogged about baking instead! Well I have now seen that friend and given her the doll so I can now show you some pictures. I'm really happy with how she turned out. I think the eyes are great - even though I may say so myself! And the bag is pretty good too :) The doll is about 30cm tall. And funnily enough, today I made some more cream cheese brownies for a Hen night that I'm just about to go to!

How to make hair for your amigurumi


I have 3 different ways that I make hair for my amigurumis.

The first is to use eyelash yarn - as in the picture above.

Here is the pattern I use to make hair for the size of amigurumi head I did a tutorial for in this blog post


Use 3.5mm hook and eyelash yarn in a colour of your choice.


Amigurumi crochet works in un-joined rounds.


These are the stitches used: you can click on any of them for a video demonstration.
Ch – chain
Sc – single crochet

This is the pattern:
The numbers in brackets indicate how many stitches there should be in that round.
The first step is the one I have illustrated in my blog post ‘the not magic ring’
for this pattern crochet in the front loops only.
• Ch 2, 6 sc in second chain from hook (6)
• 2 sc in each stitch (12)
• 1 sc then 2 sc in next stitch – repeat 5 times (18)
• Sc in first 2 stitches then 2 sc in next stitch – repeat 5 times (24)
• Sc in first 3 stitches then 2 sc in next stitch – repeat 5 times (30)
• Sc in each stitch(30)

and then from here add as many rows as you want - depending on how you would like the hair to look. Experiment with different things - have fun!


Curly hair - to make curly hair chain for as long as you want the hair to be - for example 40 stitches and then go back and single crochet back along that chain for 40 stitches and fasten off. Somehow this turns into ringlets! I dont' know how, but it looks great. Once you have enough to cover your doll's head sew them on.


Straight hair - this is the simplest way of doing hair. Just cut lengths of yarn double the length you want the hair to be. Fold the yarn in half and loop it through the head and through itself. Continue until the whole head is covered. Then you can style the hair however you want - pigtails, plaits etc...

Trying something new


Last Friday I went to the Mostarski Sajam which is a kind of trade fair thing. It is quite random, showcasing cars, boats, armchairs, clothes, books, mobile phones and... yarn! This yarn is 100% cotton. I've never used that before - and I love the fluorescent colours so I decided to buy some and give it a try. It is very different from using acrylic yarn - it has quite a hard texture, more like string. I'm working on an amigurumi at the moment using this yarn so as soon as I'm finished I'll let you see how it turns out.

How to make a mini amigurumi carrot


Do you want to make a carrot just like the one April has in her bag? If you do you've come to the right place!

These are the stitches used: you can click on any of them for a video demonstration.
Ch – chain
Sc – single crochet
2sctog/dec – decrease

The numbers in brackets indicate how many stitches there should be in that round.

The first step is the one I have illustrated in my blog post ‘the not magic ring’

Use 3mm hook and orange wool.

• Ch2, 4 sc in second chain from hook (4) – see picture a
• 1 sc then 2 sc in next stitch – repeat 2 times (6)
• 2 sc then 2 sc in next stitch – repeat 2 times (8)
• sc in each stitch (8)
• 2sc in first stitch, then 7 sc (9)
• 5 sc, 2sc in next stitch, 3 sc (10)
• sc in each stitch (10)
• 2sc in first stitch, then 9sc (11)

put carrot to one side – see picture b


take a 5cm length of green wool and hold it one end in each hand and twist it. Then let it fold in on itself so that it creates a double twisted cord. Tie a knot so that the twist doesn’t come undone – make it quite a fat knot. – see picture c


Stuff the carrot


*sc2tog, sc* – repeat 3 times sc2tog
stuff the green twisted cord into the small hole remaining at the top of the carrot – knot it first. see picture d

fasten off leaving a length of wool (tail) and then using a tapestry needle use this tail to sew up the hole at the top of the carrot so that the green twisted cord cannot fall out.

Leaf:

use 3mm hook and dark green wool. This is not amigurumi technique, this is straight crochet.
leave a long tail at the beginning
row 1: ch 5
row 2: ch 3
fasten off leaving a long tail
fix the leaf to the top of the carrot.


a tutorial on how to make the pear will be coming sometime soon... so keep reading!